Quantcast
Channel: VE9KK Blog
Viewing all 521 articles
Browse latest View live

NEWS on heading in another direction!

$
0
0
The post office delivered my change of direction this week. I’m very excited as this is going to be a 180 degree turn for me. This may sound odd but this box contains something that at times will frustrate me, take me in a direction I have never been before, expand both my  knowledge and skill and I hope as I will be retiring next year keep me amused and occupied for years to come. Below is a picture  the weller soldering iron preping some cable with Anderson power pole connectors........hmmmmm how on earth does Anderson power pole connectors fit in with my 180 degree turn?????

My change of direction leads me to this...........

$
0
0
At times it did not go as anticipated 
The fun begins
All I can say is the adventure continues..........my first stop on this journey is going well beyond the left/right mouse clicking, seeing messages on the PC that say "are you sure you want to save these changes" and finally finding out the hard way that I should never had saved the changes!! The best way I can explain this part of the adventure is.......when I am building  Ikea furniture and at one point things are just not fitting together. You find the reason is because 10 or so steps prevues you either  forgot a part, placed it in backwards or put the wrong part on. To correct this you have to disassemble to 10 steps back and correct the issue. With the PC it's easy to see things are not working as they should or as they used to be BUT ITS THE GETTING BACK PART!!
At this point (don't get me wrong I'm still having a blast) I am learning about all about static IP address, Dynamic IP address, just plan old IP address and finally Subnet mask. Oh and believe me I never knew how fast things can go wrong if your not really sure about these settings and the numbers you place in set empty spaces.
The numbers game begins

My new ham radio passion revealed.

$
0
0
My new adventure arrives
  IARU contest was in full swing and I felt it was a great time to see if my I.P. address both static and dynamic as well as the good old Subnet mask was going to bring me joy! I started the PC and with the pushing of a few buttons I was up and going. I am the proud owner of a new Expert Electronics SunSDR2 Pro. So the cat is out of the bag as some had already guessed my new adventure is SDR radio. For real VFO spinning and button pushing I still have my Elecraft KX3.  Expert Electronics has currently 4 transceivers, the MB1, SunSDR2 Pro, SunSDR2 and SunSDR2 QRP. I chose the SunSDR2 Pro for a few reasons first being the MB1 was way out of my price range. I wanted a bit more than QRP power so the SunSDR2 QRP was out of the question. The U.S dealer is NSI communications and on their site the SunSDR2 Pro was on sale as well! I order the rig and it took about a week to make it up to me in Canada. Before it was shipped Yuri from NSI communications called me just to let me know if there was any issues with setup to call him. He also advised me to download and start reading the manuals.

The SDR radio is a learning experience for me and I’m sure it is going to be the way of the future and I’m a slow learner so I wanted to get on the wagon soon. I “tried” to set the radio up on my own to have it communicate with my PC and it just went from bad to worse. I had to get the rig to communicate with my PC via the Ethernet card. I have two Ethernet cards and was getting them intermixed until I was lost. I didn’t want to get frustrated as this is a huge learning curve BUT I did give in to emailing Yuri about my situation. He promptly called me and set up a time to use Team viewer and take over my PC to figure out the issue. Within 15 minutes he had my PC and SDR radio “talking” with each other.

SunSDR2 pro 

The SunSDR2 Pro tops out at 20 watts and includes VHF and a lot more that you can read about from this LINK. As I was saying at the start of this post the IARU contest was on this weekend and I threw my SDR rig into the action. This contest gave me an opportunity to see how the receiver stacked up on a busy band. I was impressed and very much enjoyed using the second independent receiver/transmitter.
I was not an active participant in the contest I was there to see how the receiver preformed. Next I want to get my contest software and logging software on board with the SDR radio. Some draw backs I have found with this rig is.....at this point in time there is no QSK and there is no one button split operation. For split it involves a few button pushes. I have been told and read on the forum that these issues are known and solutions are being worked on.
Using the 2  receivers 

Initial setup of SunSDR2 Pro

$
0
0
To get the rig up and going it's not like most dial and knob rigs were you plug it in, turn it on and start spinning the VFO. This as most SDR rigs there has to be a talking relationship with the rig and PC. Lets start with the PC because there is going to be software on your PC that the SDR rig will have to communicate with and to do it well your PC should meet certain spec's.

Apache Labs ANAN 10 recommends an Intel i3 2ghz or better, 4 GB ram, screen resolution of 1280x1024 and a full duplex 1 GB ethernet card.

Flex radios knowledge base suggests Intel i3 or i5 quad core processor,  4GB ram for 32 bit OS and 8 GB ram for 64 bit OS, screen resolution of 1280x768 and the ability to support firewire. 

Sunsdr2 Pro recommends (located under "read it first") intel i3 1.6 ghz or higher, 8GB ram did not specify 32 or 64 bit OS, minimum screen resolution of 1024x600, LAN network card of 100 Mbps or 1 Gbps

Now mind you these in some cases are minimum specs but even to move up to the next level in a PC would not mean you are moving toward a high end gaming PC. Most of us have a PC at home for one reason or another and I would go out on a limb to say that most PC's at ham's homes would meet the minimum standard for SDR to function well. 
My SunSDR2 Pro's setup involves some minor PC techno wizbong maneuvering.......my SDR rig like most others communicate to the PC via a LAN cable and using an IP address. Now the Apache Labs ANAN 10 when powered on (if your LAN is correctly configured) an IP address should be automatically assigned in other words the rig and software should be communicating. The Flex radios are the same in regards to setup (again if your LAN is correctly configured) an IP address should be automatically assigned. This I believe is known as DHCP were the configuring is done automatically. For some reason the SunSDR2 Pro does not take advantage of this, you have to manually assign the IP address. It did not work out to well for me as I have 2 LAN options in my PC one is a card and the other is the one on the motherboard. When configuring the IP address I called up the wrong card (not the one the SDR rig was plugged into) Once I figured that out I was getting conflicts and issues. Long story short I have everything running now. I may email the Expert Electronics and ask why they chose this route and not DHCP.
The only (as far as I know) software this radio will work with is ExpertSDR software. Having said that I am very happy with the software and questions I have asked on the forum has been answered very promptly. It runs very smoothly on my PC and the waterfall looks great! The next post I will be looking at the ExpertSDR software.


Times are a changing

$
0
0
It has been some time since I have posted but it has been very busy out this way as we are moving. It has been packing, packing and more of the same!! The move is underway  so I'm looking at 2-3 weeks before VE3WDM is back up and running. We are still in a condo but the good news is we are 100 feet higher with a clear east/north east exposure.
See you soon once all the unpacking is done.

In the new place with new challenges.

$
0
0
Our view of Toronto
In the livingroom
We are  in our new place and have been for some time now also it is beginning to feel like home! I have a room dedicated to my rollmop desk with my radio equipment in it which was better than the last setup where the desk was basically in the living room. By way of an update we are still in a condo but have moved 10 floors up (now on 16) in the same condo but a 2 bedroom 2 bath which is great. The "odd" issue I have been having is my MFJ 1788 mag loop has a very poor SWR when on the balcony of the new place. The best SWR I can get is 1.6:1 and thats it, I have tried moving it all over the balcony but  the SWR just gets worse. The balcony at the old place is basically the same size as the new one. The difference is the old balcony was a 1/2 circle and the new one is  rectangle. I brought the antenna into the living room and took it apart just to check and make sure the move did not damage it. All was well with the antenna and the next odd thing is from the living room on two chairs the SWR is perfect! Very less than ideal conditions and all is good with the MFJ loop. I also have the Chameleon CHA P loop and I put that on the balcony and it tunes to a flat SWR. This issue with this antenna is it has to be manually tuned as were the MFJ mag loop can be done from the warmth of my room.
I was able to run coax along the wall in such a way that it's not noticeable and out to our balcony. I took advantage of a persian carpet runner in the hallway to hide the coax. I then used Comet CTC 50M to get the coax outside. At the old place I was able to leave the MFJ antenna on the balcony but were we are not at times the wind that comes off lake Ontario is crazy so it's indoors.....not that it matters as the SWR is very poor. In the next post an update on my Sun SDRpro 2 rig.

The MFJ loop finally has a decent SWR match!!

$
0
0
Homemade vertical mounting....."thing"
After doing some "playing" with the location of my 1788 mag loop on the balcony and getting really nowhere with lowering the SWR. The lowest I could get it was 1.6:1. I decided to go vertical with the loop to see what happened. Now those of you that have the MFJ 1788 loop know there is a bracket that comes with the loop for just this purpose. Well when I moved I know I put this bracket somewhere safe...........and it's still there as I can't remember where this "safe" place is!  I did try putting the loop vertical bout a month ago but at the time I was tired from all the fiddling around on the balcony and my vertical attempt was very hap-hazard. That approach did not seem to work for me either and I just left it at that. As time passed I decided to take a more serous approach at mounting the loop in a vertical position. I went to the hardware store and picked up some metal conduit and the finished product was a decent looking mount that allowed the loop to be vertical.  In a vertical position I knew the antenna would be directional but if the SWR was lower that was just fine with me. Low and behold on a certain place on the balcony the SWR is 1.4:1 which I am pleased with.The loop is still mounted inside a tripod on the balcony and you can see some holes in the tubing. When the new loop vertical bracket is placed inside the tripod tubing I slide a pin through. This stops the loop from spinning if a wind comes up. The next step will be to put some watts into it and see what
happens! It just really gets me how time just flies and all the non ham things pop up which make me very happy that in just over a  year I will be retired. I will have as much time as I need to get things done (not just ham things) I can't see myself getting board......well that is the plan anyway. Now I did mention in my last post about an update on the Sun SDRpro 2 rig that is going to have to wait for about 1 more week.

Tweaking the MFJ 1788 mag loop

$
0
0

The slow adjustment resistor 
In my last post regarding the SWR on my MFJ 1788 mag loop I was suggesting that I wanted to get my SWR below 1.6 and I did get it too 1.4. The reason I want as low SWR as possible is I have better  band width before I have to retune the loop. One reader of my blog Paul VA3ZC also lives in a condo and has an MFJ mag loop as well. He gave me some great great suggestions, one being to go into the loop's control box
(the box used in the shack to tune the loop) and by adjust a certain resistor I could slow the  tuning down and maybe fine tune the loop to a lower SWR.  He also suggested reshaping the coupling loop that is inside the mag loop. I decided to give the resistor a go first. It's much easier for me to open the control box and adjust a variable resistor than to open the loop up and start adjusting the coupling loop and put the loop cover on and give it a go.
What was left of battery holders
I was able to adjust the resistor to the point were the tuning light was flashing about 3-4 times per second as Paul had informed me that his loop had been adjusted to. Once done I gave the tuning process a go and it turned out the lowest SWR I could get was 1.7! I tried moving the loop all over the balcony and it made no difference. I found at a slower speed the SWR would jump very fast from 2.0 to 1.7 and bang back up beyond 1.7. It's not that Pauls suggestion was incorrect but these loops are very funny bunnies. I did take a picture of where the variable resistor was before I began the adventure and I decided to put it back to that adjustment. Low and behold I was back to the 1. 4 SWR. If I want  my next adventure will be to adjust the coupling loop inside the antenna housing BUT I just don't want to get myself in a "I wish I just had let things well enough alone" situation. I did find when I opened up the mag loop control box the battery hold turned very brittle and was falling to peaces as I handled it. The control box can run off batteries if need be but not this one until I replace the holders. With the Christmas season on us I will once again have to ask my readers to hold on with regards to the Sun SDR2 Pro SDR radio update.

Striving for a better bandwidth

$
0
0
Original shape of coupling loop 
My last couple of posts have been dealing with extending the bandwidth of my MFJ 1788 loop antenna. With the loop the lower the SWR the more bandwidth I  have before I have to retune the loop. Up to this point I have tried moving the antenna ALL over my balcony and the best SWR at that point was at best 1.6 with the loop in the horizontal position. I then gave the loop a go in the vertical position something I had never done before. I was surprised that the loop had a better SWR, I was able to get it down to 1.4 SWR. One last suggestion given to me was to adjust the internal 10 gauge coupling loop. Today I took the section of the cover off that exposed this coupling loop and moulded the loop from it's "0" shape to more like an egg shape. with doing this I was able to lower the SWR do 1.2 to 1.3 depending on the band I was on.
New and improved shape

Christmas morning surprise!!!

$
0
0
Well Christmas has past and now it's the New Year that is being pushed with the full force of the media.....join a gym, loose weight and change your career. I'm good with all three of the mentioned BUT lets get back to Christmas shall we........ or to be more precise about a month before Christmas. My wife has been listening to me "mutter" now and then about my ham radio adventure. My blog readers are well aware of my purchase of the Expert Electronics Sun SDR2 Pro SDR transceiver. I was thrilled with the rig and how it preformed was amazing. I did mention how I truly missed the knobs and dials of a "real" radio but at the same time it was somewhat worth giving up for the
waterfall, SDR funtionality and 2 independent receivers. Little did I know Julie was listening to my now and then comments about radios as I read QST. My wife who is not a ham and has made it very clear she has no interest in radio what so ever but she was able to hear my interest in SDR radio and my missing an actual rig put it together and get in touch with our local ham radio dealer. The pictures tell the story of what was under the tree on Christmas morning!!
There is going to be an Expert Electronics Sun SDR2 pro rig that is just over 6 month old up for sale very soon.

RAC contest and the new IC7610

$
0
0
I was finally able to get on the radio and give the RAC contest about 2 hours and I had a blast with the new rig. I made only 32 contacts as the  Christmas season is a busy time of the year for all of us but Julie and I both agreed that the weekend after Christmas it was going to be a relaxing weekend. As always Murphy very briefly showed up in the shack. I tuned my MFJ 1788 loop to a great SWR of 1.3 using my MFJ antenna analyser. I then flipped it over to the IC7610 and the perfect match went to 3.0!! After some trouble shooting it turned out to be a short coax jumper between my antenna switch and the 7610. I replaced it with one I had on hand and all was good. As I thought about it I do
Won't make that mistake agian.
remember at one time there was an issue with one of my patch coax cables.....guess I never fixed or tossed it out.
I was thrilled with the Icom 7610 I didn't as of yet get the time to set up N1MM+ contest software so during  the contest I was old school with a paper and pencil. The audio was crisp and clean, I stayed with the 250Hz filter and had not even one issue with very close adjacent stations bothering my contact station. The touch screen is very responsive and an absolute joy to use. I took advantage of the 2 independent receivers, I turned on dual watch and had one VFO on an RAC station such as VE7RAC who was very popular and the other VFO I search and pounced. With one simple button push I muted the VE7RAC station and could unmute to check on the pileup. Once things slowed down I was able to put VE7RAC in the log.
Dual Watch on 
Another feature I found very handy was as you spin the VFO faster your tuning steps increase so you can move up and down the band quickly. One issue I found was that as the shack got a bit darker the bottoms on the Icom are not illuminated. This being a new rig resulted in some incorrect push button selections.

SDR Transceiver up for sale!

$
0
0
I have a 7 month old Expert Electronics Sun SDR2 pro transceiver and the E-coder for sale. It is in mint condition, non smoking environment and with about 10 hours max of operating time. The reason for selling the unit is I received an Icom 7610 for Christmas and I can't justify having both radios as the SDR2 pro is just sitting on the desk doing nothing. 
New the radio and encoder sell for 2,500.00 Canadian for the 7 month old radio and encoder I am asking 1800.00 Canadian. Weil ship to U.S and Canada only. 

Main capabilities
  • Independent RX path based on DDC (Direct Down-Conversion) architecture
  • Independent TX path based on DUC (Direct Up-Conversion) architecture
  • 2 software RXs + SubRX for each of them (4 slices total) + independent wide-band Band-scope up to 80 MHz
  • Remote control operation, using it, you connect PTT and CW-key to the E-Coder panel. Microphone and E-Coder are connected to the remotely set up PC
  • TCI interface or seamless connection with third-party software like SDC (with its own Skimmer), LogHXSWISSLOG and RUMlog, more are coming
  • Professional TX processing module provides the most advanced tuning capability for voice operation
  • ExtCTRL connector to control external devices with 8 powerful keys with open collector
  • ALC connector for external power amplifiers*
  • Supports use of VHF transverters**
  • An opportunity to use the transceiver as a signal generator via DAC OUT connector (SMA connector)
  • An opportunity to use external filters in the middle of the RF path, using ADC IN and RX OUT (SMA connector)
  • Small delay in CW mode (about 10 ms)
  • Input for external 10 MHz reference oscillator
  • An opportunity to use the transceiver in SO2V mode
  • Full duplex or half duplex modes***
  • Antenna switch with 2 HF antenna connectors and separate VHF antenna connector (Mini UHF connectors)
  • Internal power-meter for HF and VHF bands and SWR-meter for HF band
  • Ethernet LAN interface provides fast and reliable connection to PC
  • 20 watts on HF and 8 watts on VHF.
I am also selling with it the radio the E-Coder plus which has:
  • 14 programable buttons with 60 possible programming options 
  • 3 programable encoder knobs with 13 possible programming options
  • 1 optical encoder tuning knob 
For an unbiased review of the radio go to Eham reviews and there you will find 11 reviews all giving the radio a 5.0.  
2 Receivers in action 
All cables

Rear view

E-coder

FT8 on 20m this afternoon

$
0
0
I was able to find some spare time this afternoon and in true ham radio spirit I hauled out the MFJ mag loop set it up on the balcony and gave FT8 a go on 20m. Last week I finalized the setup of WSJT-X 2.0 and my rig the Icom 7610. Once all the settings are looked after running WSJT-X with the 7610 is a breeze. I was spotted all over the U.S. and Canada and even into Europe while on 20m. I did make 3 U.S contacts but only logged 2 as I at first did not have the setting in Reporting "Log Automatically" or "Prompt me to log QSO" Unfortunately my memory is not what I think it to be and  I lost the first contact by forgetting to log it. So it was then that I went to Settings-reporting and checked the box "Log automatically" I was excited to see my FT8 signal was heard in France, Spain and Portugal. Over all it was a very relaxing day on the radio!
I found this site that offers some great FT8 tips:

I did remove the tick from the "auto Seq" box as by doing this it did give me somewhat of a feeling of interaction with the QSO. This evening it's going to be a cup of Earl Grey tea and go over the WSJT-X 2.0 manual very closely and see what I can glean from it. Also search out some writeup's on the internet for more tips with this mode. 


Article 0

$
0
0
A screen shot of the ARRL DX CW contest
I was on for a short time yesterday afternoon but we had a dinner date to go to in the evening so things were cut short. I stayed on 20m as it seemed to be producing very surprising results including a contact into Japan. I was shocked when I heard his call just come from out of no where! I gave him a call and he came right back to me and in about 5 minutes after he was spotted along with some other JA's the pileup was huge. It was just luck I was where I was at the time and made the contact with 60 watts and my MFJ 1788 loop.
I will see if the propagation gods are smiling down on me today as I give the contest another go this afternoon.

ARRL DX CW 2019 in the books

$
0
0
The setup
Well the ARRL DX CW has come and gone for 2019 and my effort was one of interest only. I knew I had non radio related things to do this weekend and we were out each evening. Actually the contest caught me by surprise as I usually plan ahead and make time. This week I was checking WA7BNM contest site and was shocked to see the contest was this weekend! This was the first real contest run for my new IC7610 rig. Now I am used to the Elecraft K3 but honestly the 7610 preformed for me just as good as my K3 did. I left the filter set at 250Hz and never had any issues when Kilo watt  contesters were side by side belting out their call. The waterfall  on the 7610 was par with my old Elecraft P3 also it was an added bonus that N1MM+ has a spectrum scope fed directly from the 7610. Having the two independent receivers was nice. When I found rare DX but there was a pileup I left one receiver there and checked in now and then. With the other receiver I would continue the search and pounce. I had been away from the 7610 for about 2 weeks regarding CW operating so I at times found I was slow to figure out how some functions were done.
As for the contest I was running 60 watts (not sure of reason for the 60 watt number) and my antenna is the MFJ 1788 mag loop. I am in a condo so it’s a balcony antenna about 180 feet up facing south east. The software was N1MM+ and MRP40 CW decoder for the super fast fisted contesters. On Sunday the winds for some reason really picked up and my MFJ loop was moving around the balcony. I shut the radio down and took it in I would rather save the antenna from damage than taking a chance on getting more contacts.
I made only 25 contact and a score of 1575 BUT my intention was not to blow the doors off  with a great score. Instead after I made contact with a station I would look them up on QRZ.COM and read about either the individual or the contest station. Over all the limited time I was in the contest I had a blast and was very please with the Icom 7610 and the ability of my balcony mounted Mag loop antenna.


Ham radio and the condo life

$
0
0
Ham radio from a city condo.......I have been doing it for close to 7 years now and it does have it's challenges. I have had great success with some cool world wide contacts. In Canada it's tough to get into the housing market right out of the gate so many younger ham's are getting their foot into the market with condo living. Then those ham's who are retiring and want to downsize are considering condo life as well. I am here to say that in condo life there is also ham radio!! 

Before we talk about the nuts and bolts of condo ham radio lets deal with some of the basics. I have always found it avoids condo board letters if you read and understand the rules and guidelines of your particular condo. Yes get used to it if you are going to move into a condo there are rules and expectations. What does this have to do with ham radio.........well if you are seen as a respectful owner (or renter) of the condo board, residents and property it can go a long way. For example most condo guidelines (nice condo word for RULES) do not allow "permanent antennas" on the balcony. This rule is yes for Amateur radio antennas but I believe the condo is concerned about the mini satellite dishes springing up or HD antennas. Just one of many challenges a condo radio op has to creatively deal with. In my case I have the MFJ 1788 mag loop and in my newest condo (6 months now) the antenna is portable and it not  "permanently" mounted on the balcony. In my humble opinion having a low key antenna is important. Having whip antennas extending over the balcony or wires making their way down the side of the building just invites a letter from you know who from the office of your know where!!  Like it or not we are all human and once this happens you have the microscope on you.....not a very nice situation to be in.
In a condo your fellow "condo-ites" are very close to you and that means RFI on your part but also on their part as well with all the unfiltered electronics on the market today. The positive outcome to this is you will become very knowledgeable on dealing with RFI. Oh and a word of advise.....I have read this in the past "go see your neighbor and suggest installing filters on their electronics" Up here in the land of snow and proverbial "thank you" we always say to apparently to everything......there is no thank you response from someone you are asking to tamper with their electronics. Rigs these days have excellent filtering and that are some accessories you can purchase to knock out the worst of offender.
Well that is enough for today....in posts to follow I am going to look at RFI, power output and no as a condo dweller you are not a QPRer for life...........nothing wrong with that either!! What antennas I have had that work, some of the better modes (not just digi either)  to work and last but not least what happens if your in a situation were absolutely operating is possible, well I am here to say that you will still be able to get on the air in you condo on HF working DX!
Stay tuned.        


PART 2 of ham radio and the condo life

$
0
0
Roll-top open and it's a nice station setup
Good afternoon everyone.........today lets look at the condo itself shall we?  Mixing ham radio and condo living does not mean you have to start looking for a new hobby! It's true there is no more tower with a Yagi on it but with condo living you may gain height anywhere from 30 to possibly 400 feet up. In my case I am at the 180 foot level in my previous condo I was at the 60 foot level. Most condos have a balcony of various sizes which can serve as a spot to place an antenna. In my case because this place is built like a brick you know what and there is some type of glazing on the windows that just does not allow me to operate with an indoor antenna. I have tried the loop indoors and I get no hits from reverse beacon network and no answer when operating FT8 and no digi reports on WSPR. In the past I was in a smaller wood construction unit and I had no issues placing my mag loop indoors and operating QRP. Also the smaller wood construction units may also give you access to an attic. This was the case for me and I did very well with multiple antennas in the attic. More on antennas in up coming condo life posts. Indoor space is also another consideration as you have to incorporate your station in a smaller living space. My solution to this issue was to use a nice roll-top desk. I am able to have all my radio equipment under the cover of a nice piece of furniture and when I roll the top up it's my station. Running coax out to the antenna can be a challenge, in this unit my roll-top is in the spare bedroom. The coax leaves the room under cover of a Persian run in the
Ham radio gone under cover
hallway. Into the master bedroom (under the baseboard at the doorway) then behind the dresser (out of site out of mind) and then onto the balcony as we have 2 sliding glass doors onto balconies. How might you ask does one get the coax out the balcony door?? More about that in a followup condo life post. So in a condo you may have an attic to use, if wood construction indoor antenna may be a possibility? Even in a solid concrete condo give an indoor antenna a go you may be surprised. You can take full advantage of height depending what floor you are on. Finally you may have a balcony were you can allow you mind to percolate as to how and what antenna to use. Speaking of antennas the next "Ham radio and the condo life" I will be looking at my experiences with antennas some failures and other successes.    

FA- VA4 antenna analyzer kit.

$
0
0
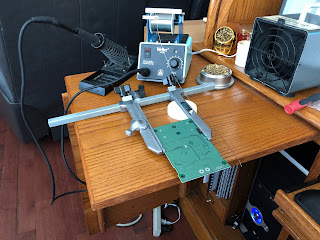
The condo kit corner.
About a month ago my FA-VA4 vector antenna analyzer kit came in and it has sat idle until Friday. I had the day off and with everything done that needed to be done, I say "everything that needed to be done" because there is always something to get done! I decided it was time to put the kit together. This really is the first kit I have attempted to assemble since moving into our small condo in Toronto. I no longer have the huge desk, nice lighting and the room to place all my equipment around me. Now it's a roll top desk with 2 slide out shelves, that is my only choice for kit work now. Trying to get the exhaust fan, soldering station and other small miscellaneous items in place is a real challenge. What was also a challenge was remembering where the heck I placed things in the dam condo! I have a nice Panavise setup for holding my boards in place while soldering. I could find the arms but I was not able to locate the base. I looked everywhere but had no luck and nothing bothers me more than knowing it's somewhere but just not able to find that "somewhere". I had to settle for placing just the Panavise arms on the slide out and do my best. I found very quickly that working in a tight space one has to be very aware of cords and tools, a few times moving the soldering iron in place almost had the soldering iron cord take the make shift Panavise (holding the circuit board) onto the floor. The kit from Box73 comes from Germany, the shipping time was fantastic as well as packaging. There is no SMD work to be done that was done and I only had to mount some connectors, power on switch, pushbuttons and the LCD display. After being away from kit building for a very long time this was a nice way to jump back into things. I first took an inventory of the parts and this is something I always do. I hate getting to the point when a part can't be found and your not sure if it was not shipped or misplaced by me? Doing the inventory allows me to contact the vendor and in the case of large projects the part arrives in time for that point in the assembly. Everything was there and it was now time for the next important step...read over ALL the assembly instructions. In my case I go the extra step and check out YouTube videos and the internet to see if there are any pointers that others have come across to make things easier or things to avoid.  One of the builder beware tips I read was from John AE5X blog to not use lithium batteries as the voltage is to high and the FA-VA4 will repeatedly reboot. This type of information is invaluable when kit building. It saves trouble shooting time and going down possibly a long road of parts testing.
This kit does have SMD parts that I said are factory installed BUT some of the items that the builder needs to install are very close to some SMD parts. This brings me to another important part of kit building....spend the money to get the right tools for the job. In this case my Weller WES51 has a large variety of soldering tips. I find the fine chisel tip (Weller ETM) worked great for soldering the LCD terminals, the larger tip for the BNC connector (Weller ETD) and finally the intermediate tip for the components beside SMD parts( Weller ETB).
The instructions had me installing the ON/OFF slider switch first and this was a great start for this old rusty kit builder.  I then moved onto the 3 rails in which the LCD would eventually plug into. You will notice from the picture these are raised up on the board. Each pin has a "collar" so the rail will be at the proper hight but the builder has to be cautious and make sure the rail is firmly seated and upright and straight. One rail is 20 pins and once it's in....it's in! In the past I have had to remove these types of components due to my own lack of attention. IT IS NOT FUN and I have a Hakko desoldering tool  which make desoldering a pleasure but even with that tool removing a 20 pin rail is not fun at all. Take the time to set these parts up for first time correct soldering. My method was taping the rail in place, solder the 2 opposite end pins, check for upright correctness and firm seating on the board. If all is good solder the remaining pins. The other components were easy to solder in place when using the proper tips. I have a 
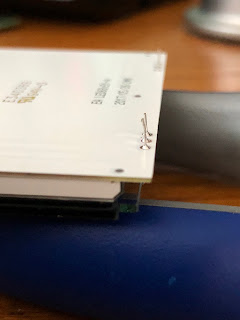
magnifier head set  and use it to make sure all connections are soldered properly and that all were done. You would be surprised how many times when multiple pins are involved how easy it is to miss a pin.  The LCD needed to be soldered to the backlight, it involved a 20 pin connection on one side. The instructions said I only "had" to solder the 2 outside pins. I chose to solder all 20 and then on the opposite side of the LCD there were 2 sets of 3 pin connections that need all pins soldered. To make sure the LCD was firmly against the backlight I used some tape. Once the LCD was ready to go again I took time to inspect the pins that were going to plug into the 20 pin and two 3 pin rails. I did find one of the 3 pin setups ups on the LCD was bent! I corrected this but if I failed to see this could had resulted in broken or bent pins.
There is two AA battery holders that need to be soldered in and all I can say is check and double check this. Mixing this up polarity can bring smoke to the smoke test. Believe me it can happen. One of the Elecraft K2 kits I put together almost ended in disaster when I was not paying attention and soldered up a power cable with Anderson pole connectors. I soldered red wire to Anderson black connector and black wire to Anderson red connector. It gets better.....I then plunged it into the K2 and powered the K2 on!! The Astron power supply made a noise and both the inline fuses on the main Astron power supply blew. I was very luck and now double check everything.
It was now time for the "smoke test" and I was so proud of my first kit in over 4 years I had my dear wife Julie come over for the ceremony.......I flipped the switch and........yup you guessed it...NOTHING!!!!! Yup nothing.....but no smoke and that is a good sign. Julie giggled and moved on to other tasks. I made a mental note to always solo a smoke test and avoid the embarrassment. The problem was one of the AA batteries was not firmly in place. Once looked after the power on test was a success. I called Julie over for her to check out the kit but it just did not have the same excitement. That was it for the kit building for the day I still have to preform the calibration. Over all the kit was a  joy to put together and by way of some side notes. The case is a brushed aluminum with attention to detail such as counter sunk screws for securing case, the LCD and buttons lined up perfectly and a nice touch was not having stick on rubber feet (that always over time seem to come off and get lost) This kit came with pull through rubber feet. I still have to calibrate the unit and actually use it but that will be another day.
Completed kit
Smoke test 
Bent LCD pins 
Supporting the 20 pin connector.
Completed LCD pins 

Where has the site Band conditions gone?

$
0
0
Where did the site Band conditions go?? I have this site as one of my tabs on the blog and it either seems the link has been changed, the site is temporally down or it's gone? Does anyone have info on this maybe I missed the memo about a new link to the site?

CW key dilemma

$
0
0
Well here we are it's almost the end of 2017 as I was out for a pint with my Ipad and looking at some of the blogs  I follow. I came across PE4BAS's blog and after reading his post I checked out the blogs that he follows to see what else was new in blog world. As I scrolled down I came across the blogs that have not posted in over a month. Low and behold there was VE3WDM.....it has been over 4 weeks since my last post!! I have to be honest this is not the first time I have gone for a month without posting. There was a time when I was posting twice a week and for sure once a week, since our move to Toronto I have not been on the radio as much as I would like. In the evenings  after dinner I just feel too tired to get on the radio. Anyway......I did get on the radio this weekend and found the RAC Canada Winter contest in full swing. I was not prepared to give the contest a full out go but I was able to make a leisurely 7 contacts. With my modest setup I was able to contact CW coast to coast in Canada and a station in France. What I like to do is have QRZ.COM going in the background on the computer as I make a contact I look them up and read about their station.

Some time ago I purchased a Begali Key, the Contour key. I have read lots about having a good key, of how it makes sending the code an art. I have to say that from day one the Contour key and I have had a love-hate relationship! The craftsmanship of the key is next to none as are all of the Begali keys. I am not sure if it's just this key or the contour keys but for way to long when ever I use this key I send extra dots and dashes or the spacing gets screwed up. I used to think it was just me and my sloppy fist until I did more portable op's and used the Mini Palm paddle.  I just never seemed to miss a beat with this paddle there was no extra anything and the code was very smooth all the time. I have contacted Begali and exchanged many emails about adjusting the key, cleaning the contacts on the key and spacing the contacts on the key. It just seems to be the same old frustration with the Contour key. When I got on the radio today for the RAC contest I started out with the Begali key and after sending some very simple but very embarrassing exchanges I switched to the Mini Palm Paddle and exchanges were sent with not one error. I would put the Begali key up for sale in a second but it has my call engraved in it. I still think nothing can be said for a good quality key but it seems the Begali Contour is just not for me.
Viewing all 521 articles
Browse latest View live