Quantcast
Channel: VE9KK Blog
Viewing all 521 articles
Browse latest View live

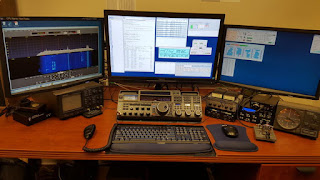
Station comfort and ergonomics

$
0
0
 
My setup now with one monitor on a swivel arm to the right
In this month’s QST I found an article that sparked my interest entitled “Comfort design for your station” This is an area I feel that gets looked over when setting up a station. Most of the time I find we lean more towards how the setup looks as to the ergonomics of the setup. I am very guilty of falling into the trap of setting up a station making sure it looks very pleasing to the eye. After a contest or two and having to sit down at the radio for over 6 hour or more at a time I become very aware that it’s all about ergonomics first and looks later.  These days setting up a station most of the time does not just mean a radio but it can include a computer monitor, Laptop and various bits and pieces.  Some of the mistakes I made:
Rig and monitor up to high
  1. I had selves on the desk and I decided to put the monitor on one of the shelves, it looked very cool but over time I found the slight angle my head was on looking up (just slightly) became a chiropractic issue! I then decided to purchase a moveable arm for the monitor so I could adjust it to any position and this proved to be a great investment. 
  2. Since the radio is the most expensive item I had it front and center on the desk. For me over time I found having my arm extended in front of me was not very comfortable. It may sound strange but the best position for me is having the radio off to my left or right side. My right arm keeps its natural bend as I tune and adjust the radio. 
    Monitors on swivel arms
  3. Sideview of swivel arms
  4. I’m not sure about Icom, Kenwood or Yeasu but Elecraft has only 2 heights for the rig……either flat on the desk or with tilt stand (K3) or legs (KX3).  For me both are just not comfortable. I wish they would incorporate adjustable legs for custom heights. I did purchase the Elecraft K-pod which fixed this height issue but that was not the sole reason for the K-pod purchase. 
In closing there is one radio desk setup that I have seen now and then on the internet and thought for me it would be the best and I say "thought" because it only looks comfortable in the picture and until I was to try it I would not know for sure. It involves mounting the rig right into the desktop and almost having it flush with the desktop. Below are some pictures of this and if you have done this or tried it please post your comments about this setup. 


Digital magazines

$
0
0
Still in the bag
The last time I renewed my QST magazine subscription not only did I get my monthly print addition of QST but I would receive an email about a week or so before the print copy arrived informing my digital copy was waiting for me to download and view. I will admit I was one of those ham's that just wanted to feel the pages, hold an actual copy and ear a page to come back to it later. I had some spare money in my Paypal account and I decided to once again subscribe to CQ magazine but this time I decided to only go with their digital version of the magazine. In the past I had big issues with the delivery of the magazine so I wanted to avoid this again. It was the reason I cancelled my CQ subscription some years ago. As the CQ issues started to arrived I was forced to get used to reading the subscription on line. I found out over time the best method of delivery for me was on my Apple iPad pro. For me it worked seamlessly and to be honest it was the viewing of the occasional QST on my PC that frustrated me with the digital age of magazines. As I read my paper copy of QST each month ignoring the email about a digital copy waiting for me in my inbox! Those at the ARRL who publish the QST magazine are very clever in that they tease you with tidbits "you can view more content in the digital version" "Here is a video of the review that can be viewed in the digital version" I began now and then to download QST's digital version to my iPad pro (once I downloaded the app) After a very short time I was hooked on the digital version. Now the print copy stays on my night stand and sometimes a month goes past and it does not even get removed from the shipping plastic. Why not just subscribe to the QST digital version you ask??  I have now as I found in their FAQ how to unsubscribe from the print version. There is no savings to the member for doing this but I am told that the money saved QST puts that to good use. I have no issue with this and am happy to my this "donation" to the ARRL.
For those of you where like me and have not as of yet jumped into the digital magazine world I will say it's a very interactive way of reading. CQ uses a program called Zinio to view their magazine and QST uses Pagesuite It may just be me but I find Pagesuite easier to use, nice graphics and well laid out and I hope one day CQ will start to use them as well as Zinio.
Some of the advantages I find with having a digital copy are:

  • Ability to view videos (QST often has product reviews and a video to along with it)
  • Web links that can take you to more content. 
  • Ability to enlarge the print which is good for me. 
Some of the disadvantages:
  • You can't just roll up the tablet or PC under your arm and take it with you. 
  • To download a new addition the internet is needed. 
  • To take full advantage of the digital copy again the internet is needed. 
For me I find the Apple iPad pro does an amazing job as I am sure any other tablet would but I am  an Apple fan. As for carrying around my iPad I use the Otterbox product to protect it. The way I look at it if you are going to spend good money on a tablet or phone at least spend 1/4 of the price on something that is going to keep it safe. 

Going about it the hard way.....WHY??

$
0
0
Last evening I finally had some time to get on the PC and check out what fellow ham radio bloggers were up too. For the past month I have been working every day and only having time to "fast read" a post and drop a short comment. While surfing the blog sphere last evening I came across KG3V's blog, the subject of the blog caught my attention "Updating FTDX-3000 Firmware. Below is a link to what I only could call an "adventure".
https://kg3v.com/2017/10/14/updating-ftdx-3000-firmware/

In the post Tom does a great job explaining how he went about the firmware upgrade and some issues he ran into. Tom also goes over the enhancements this firmware will forward to his FTDX-3000. It's fantastic how far we have come in radio, in the past if you wanted the upgrades it meant selling what you had and purchasing the new and improved version. Today's modern rigs can chat either over the internet or with pre-downloaded thumb drives and magic is worked within the rig to either over come an issue, enhance what is already there or add something new! Having said that I just can't understand what the issue is with the process of the upgrade. It's just not ham radio with our Nikon cameras to upgrade the firmware it's...hold this while pushing that....make sure you don't do this while doing that....and on and on and on. Resources are used writing the rigs new firmware upgrade, time and money is put into it and it's to make the product better for the end user. If this is the case why the %&^* not make the process for the end user easy peasy!!
Having said the above and let me preface this with "I am not going to say what I am about to say just because I am a fan of Elecraft but if the shoe fits......" To upgrade my K3 or KX3 Elecraft has provided via their website a program that sits on your desktop, one of it's functions is for firmware upgrades. The process is as follows:
1. Double click on desktop icon.
2. Click on Firmware tab.
3. Click on "Check versions now"
4. Below you will then see the firmware that is installed in your rig and new firmware that is available for your rig. You then click on "Send all new firmware to K3 or KX3.
Your rig will start to click, there will be "stuff" flashing on the rigs screen, sometimes even clicking noises from the rig and then your rig's screen returns to normal and your done. I have owned Kenwood, Icom and Yeasu rigs and never has it been this easy and my question is WHY NOT!!! Now having said the above it is true I have not owned one of the above rigs for some time now so do comment if the process has changed...but is sure does not seem it has for the FTDX-3000 model rig!
OK I'm off my soapbox now....:))

Article 0

$
0
0
I just can't believe the weather we are getting for it being half way through October. The temperature today was 22C with clear skies and just a gentle breeze off the lake. This is a great time to grab the KX3 and head out for some portable op's. I check the contest calendar to see what was happening in the way of CW contests. I found the NYQSO party and Worked all Germany (WAG) contest were going to be in full swing the same time I was out. I checked to see what the contest report was supposed to be, contesters can add lots of contacts to a portable op. I set up beside the lake (Lake Ontario) with a nice breeze and in the shade as the sun was out and I did not want to overheat. I made 20m my band of choice and it so happens that it was alive with WAG contesters. The band was in great shape and lots of German stations looking for DX stations to fill their log! I was using my Elecraft KX3 at 10 watts and my Chameleon mag loop antenna. I was set up in 10 minutes and on the air searching the band for contacts. I was on the air for about an hour and had the following contacts:
DF0DW           WAG contest
IQ1GE             DX calling CQ
DJ0SP              WAG contest
DL5HIA           WAG contest
DF8AA            WAG contest
W2RR              NYQSO party
DJ6OZ             WAG contest
DL0DA            WAG contest

As you can see the WAG contest dominated the bands and it turned out the NYQSO party participants were just not making it over the German WAG contesters. I did not include the signal reports in the above list as it was a contest so the standard 599 was sent. I knew I was no were close to 599 as the German stations asked on more than one occasion for a repeat.


Another day of outdoor op's

$
0
0
The view from my other spot along the lake
I had the day off work today and it was another amazing day up this way for fall so I headed outdoors again with my KX3. This time I was out and about in the morning and was expecting 20m to be shut down and possible 40m opened up. I found 20m was open and never ended up checking 40m at all. Once again I headed toward the lake and this time my "spot" was taken with someone who also was taking advantage of the great weather. I was watching the weather forecast this morning and it looks like "seasonal reality" is going to set in very soon! This time I set up a little further along the lake at a picnic table. Today I was happy to make 3 CW contacts:

1. WA5OVB Phil's IC 7200 was doing a great job picking up my portable signal I gave Phil 579 report and I was given a 569 with some QSB.
The Chameleon CHA P antenna setup

2. KW7D Paul's signal was strong, he was in New Mexico where the weather is much more pleasent than it is going to be up this way. Paul was calling CQ and I was able to catch his attention with my portable signal.

3. K3PR is Joes call and we had a nice long QSO exchanging as much info as we could. At first my signal was in around a 229 but conditions changed and I moved up the scale to 559! Joe and I had a nice QSO about antennas, rigs, WX and just what we were up too.

I did hear a station 4U1A the United Nations in Austria and when I first heard their CQ call they had not been spotted and I was trying to get their attention from my portable setup. I did not have any luck and even less luck after they were spotted and the pileup began.
Things pack up very nicely. 


FA- VA4 antenna analyzer kit.

$
0
0
The condo kit corner.
About a month ago my FA-VA4 vector antenna analyzer kit came in and it has sat idle until Friday. I had the day off and with everything done that needed to be done, I say "everything that needed to be done" because there is always something to get done! I decided it was time to put the kit together. This really is the first kit I have attempted to assemble since moving into our small condo in Toronto. I no longer have the huge desk, nice lighting and the room to place all my equipment around me. Now it's a roll top desk with 2 slide out shelves, that is my only choice for kit work now. Trying to get the exhaust fan, soldering station and other small miscellaneous items in place is a real challenge. What was also a challenge was remembering where the heck I placed things in the dam condo! I have a nice Panavise setup for holding my boards in place while soldering. I could find the arms but I was not able to locate the base. I looked everywhere but had no luck and nothing bothers me more than knowing it's somewhere but just not able to find that "somewhere". I had to settle for placing just the Panavise arms on the slide out and do my best. I found very quickly that working in a tight space one has to be very aware of cords and tools, a few times moving the soldering iron in place almost had the soldering iron cord take the make shift Panavise (holding the circuit board) onto the floor. The kit from Box73 comes from Germany, the shipping time was fantastic as well as packaging. There is no SMD work to be done that was done and I only had to mount some connectors, power on switch, pushbuttons and the LCD display. After being away from kit building for a very long time this was a nice way to jump back into things. I first took an inventory of the parts and this is something I always do. I hate getting to the point when a part can't be found and your not sure if it was not shipped or misplaced by me? Doing the inventory allows me to contact the vendor and in the case of large projects the part arrives in time for that point in the assembly. Everything was there and it was now time for the next important step...read over ALL the assembly instructions. In my case I go the extra step and check out YouTube videos and the internet to see if there are any pointers that others have come across to make things easier or things to avoid.  One of the builder beware tips I read was from John AE5X blog to not use lithium batteries as the voltage is to high and the FA-VA4 will repeatedly reboot. This type of information is invaluable when kit building. It saves trouble shooting time and going down possibly a long road of parts testing.
This kit does have SMD parts that I said are factory installed BUT some of the items that the builder needs to install are very close to some SMD parts. This brings me to another important part of kit building....spend the money to get the right tools for the job. In this case my Weller WES51 has a large variety of soldering tips. I find the fine chisel tip (Weller ETM) worked great for soldering the LCD terminals, the larger tip for the BNC connector (Weller ETD) and finally the intermediate tip for the components beside SMD parts( Weller ETB).
The instructions had me installing the ON/OFF slider switch first and this was a great start for this old rusty kit builder.  I then moved onto the 3 rails in which the LCD would eventually plug into. You will notice from the picture these are raised up on the board. Each pin has a "collar" so the rail will be at the proper hight but the builder has to be cautious and make sure the rail is firmly seated and upright and straight. One rail is 20 pins and once it's in....it's in! In the past I have had to remove these types of components due to my own lack of attention. IT IS NOT FUN and I have a Hakko desoldering tool  which make desoldering a pleasure but even with that tool removing a 20 pin rail is not fun at all. Take the time to set these parts up for first time correct soldering. My method was taping the rail in place, solder the 2 opposite end pins, check for upright correctness and firm seating on the board. If all is good solder the remaining pins. The other components were easy to solder in place when using the proper tips. I have a magnifier head set  and use it to make sure all connections are soldered properly and that all were done. You would be surprised how many times when multiple pins are involved how easy it is to miss a pin.  The LCD needed to be soldered to the backlight, it involved a 20 pin connection on one side. The instructions said I only "had" to solder the 2 outside pins. I chose to solder all 20 and then on the opposite side of the LCD there were 2 sets of 3 pin connections that need all pins soldered. To make sure the LCD was firmly against the backlight I used some tape. Once the LCD was ready to go again I took time to inspect the pins that were going to plug into the 20 pin and two 3 pin rails. I did find one of the 3 pin setups ups on the LCD was bent! I corrected this but if I failed to see this could had resulted in broken or bent pins.
There is two AA battery holders that need to be soldered in and all I can say is check and double check this. Mixing this up polarity can bring smoke to the smoke test. Believe me it can happen. One of the Elecraft K2 kits I put together almost ended in disaster when I was not paying attention and soldered up a power cable with Anderson pole connectors. I soldered red wire to Anderson black connector and black wire to Anderson red connector. It gets better.....I then plunged it into the K2 and powered the K2 on!! The Astron power supply made a noise and both the inline fuses on the main Astron power supply blew. I was very luck and now double check everything.
It was now time for the "smoke test" and I was so proud of my first kit in over 4 years I had my dear wife Julie come over for the ceremony.......I flipped the switch and........yup you guessed it...NOTHING!!!!! Yup nothing.....but no smoke and that is a good sign. Julie giggled and moved on to other tasks. I made a mental note to always solo a smoke test and avoid the embarrassment. The problem was one of the AA batteries was not firmly in place. Once looked after the power on test was a success. I called Julie over for her to check out the kit but it just did not have the same excitement. That was it for the kit building for the day I still have to preform the calibration. Over all the kit was a  joy to put together and by way of some side notes. The case is a brushed aluminum with attention to detail such as counter sunk screws for securing case, the LCD and buttons lined up perfectly and a nice touch was not having stick on rubber feet (that always over time seem to come off and get lost) This kit came with pull through rubber feet. I still have to calibrate the unit and actually use it but that will be another day.
Completed kit
Smoke test 
Bent LCD pins 
Supporting the 20 pin connector.
Completed LCD pins 

Where has the site Band conditions gone?

$
0
0
Where did the site Band conditions go?? I have this site as one of my tabs on the blog and it either seems the link has been changed, the site is temporally down or it's gone? Does anyone have info on this maybe I missed the memo about a new link to the site?

CW key dilemma

$
0
0
Well here we are it's almost the end of 2017 as I was out for a pint with my Ipad and looking at some of the blogs  I follow. I came across PE4BAS's blog and after reading his post I checked out the blogs that he follows to see what else was new in blog world. As I scrolled down I came across the blogs that have not posted in over a month. Low and behold there was VE3WDM.....it has been over 4 weeks since my last post!! I have to be honest this is not the first time I have gone for a month without posting. There was a time when I was posting twice a week and for sure once a week, since our move to Toronto I have not been on the radio as much as I would like. In the evenings  after dinner I just feel too tired to get on the radio. Anyway......I did get on the radio this weekend and found the RAC Canada Winter contest in full swing. I was not prepared to give the contest a full out go but I was able to make a leisurely 7 contacts. With my modest setup I was able to contact CW coast to coast in Canada and a station in France. What I like to do is have QRZ.COM going in the background on the computer as I make a contact I look them up and read about their station.

Some time ago I purchased a Begali Key, the Contour key. I have read lots about having a good key, of how it makes sending the code an art. I have to say that from day one the Contour key and I have had a love-hate relationship! The craftsmanship of the key is next to none as are all of the Begali keys. I am not sure if it's just this key or the contour keys but for way to long when ever I use this key I send extra dots and dashes or the spacing gets screwed up. I used to think it was just me and my sloppy fist until I did more portable op's and used the Mini Palm paddle.  I just never seemed to miss a beat with this paddle there was no extra anything and the code was very smooth all the time. I have contacted Begali and exchanged many emails about adjusting the key, cleaning the contacts on the key and spacing the contacts on the key. It just seems to be the same old frustration with the Contour key. When I got on the radio today for the RAC contest I started out with the Begali key and after sending some very simple but very embarrassing exchanges I switched to the Mini Palm Paddle and exchanges were sent with not one error. I would put the Begali key up for sale in a second but it has my call engraved in it. I still think nothing can be said for a good quality key but it seems the Begali Contour is just not for me.

HAPPY NEW YEAR.....I have a plan

$
0
0
A belated Happy New Year to all the readers of the blog! So now that we are 2 days into the New Year what is the long range forecast for VE3WDM? While we are on the subject of forecast the weather up this way has been to say the least DAM COLD!! There does not seem to be a break anytime soon with the forecast this weekend temp's are to be in around -30 with the windchill.  Lets warms things up with some 2018 plans. This year Julie and agreed that it's the year to cut back starting with our cable TV that can run way over 125.00 per month. I purchased a small HD antenna and am able to pickup (for free) close to 30 channels. This week the cable company will be getting a disappointing call with our cancellation. We also have Apple TV 4k and pay a minimum for Netflicks and Crave TV. The other cord we are cutting is the eating out which we are planning on moving to only once a month as eating at home is cheaper and can be healthier as well. Regarding ham radio I have all I need and some but my plan this year is to get on the radio and pound out some CW! With the conditions not being so great I have still been able to make contacts both here in North America and over seas.  I worked dam hard over the years to learn CW and get my speed up and it's like a language that if you don't use it you loose it. I am also set up for the digi modes just to change things up a bit. Finally with less TV and going out it looks like I am going to catch up on my ham radio  reading. These are not drum roll type plans for the New Year but it's a start!

WOW those high end rigs!!!

$
0
0
Had some time today and for some reason I had a look at the top of the line dream HF rig's. First off is the  Elecraft K3S with the contest and DX package priced at 5900.00 (all prices in Canadian dollars) to be fair to all the other high end rigs you would have to add a power supply bring the price in at 6050.00.

Next in the line up is the Kenwood TS 990S priced at 7995.00 ( or as I like to say 8,000.00) for the price this is a nicely packed rig and unlike the Elecraft or Flex radio it does not need a power supply. Like the Elecraft you get 2 independent receivers but you get the added bonus of 200 watts of juice to send out your call.

Moving along to the Flex radio 7600-GPSDO in at 10,800. This rig is the top of the line for Smart SDR rigs and the one feature that sticks out to me is the 8 slice pan-adpater. Having said that just a bit of over kill for me. Here is a link for all the features of this amazing Smart SDR rig.  This rig also needs a power supply so I will add another 150.00 (same supply that was priced for the K3S) now you are looking at 10,950. The price does include the GPSDO module which is not cheap and also this rig has VHF an option not included in the K3S price.

Icom has a heavy hitter when it comes to high end rigs and it's the IC-7851 and a break the bank price at 17999.00 ( or.......you got it 18000.00) It does have a great TFT display, two receivers and 200 watts out.....but really 18,000.00 freaking dollars!!!!

The Yaesu FTDX-9000MP comes in next at 14,500.00 as with the other rigs 2 independent receivers and a whooping 400 watts output.......oh hang on just been checking and the 9000 and 5000 series rigs have been discontinued by Yaesu!!! The only rig that is left for the high end category is the FT DX 3000 at 2499.99 (lets call it what it is 2500.00).
Please correct me if I am going down the wrong path but I think Yaesu may has seen the light in that the cost to produce the very very high end rigs is just not drawing the sales to make it profitable? Now the DX 3000 rig is (in my humble opinion) a mid range rig and hopefully Yaesu will produce a rig above the DX 3000.....independent receiver and so on. BUT maybe Yaesu has taken a step back to move forward with a  "high end rig" that is within range of more hams.

In closing as my readers know I am an Elecraft nut!!! Not to be tooting my Elecraft horn but they do have a great concept and that is you purchase a radio and in time add to it. The purchaser may add to the rig in time maybe due to budget restraints at the time or maybe your ham experience changes and you may want to dive into the digi modes or VHF.
In conclusion I just can't understand rigs that cost 18K or 10k for that matter but as I said before this is my humble opinion.

The Icom 7610 is here!!

$
0
0

The long awaited Icom 7610 is now available, the spec's on this rig are very impressive. I would say that for all this rig offers it is priced VERY COMPETITIVELY! I won't list the spec's just provide this link that gives you the run down........see what you think?

A fantastic FT8 guide!

$
0
0
If you have or are thinking of diving into the FT8 digi world I was made aware via a Dutch blogger Paul PA0K (his brand new call) of this amazing FT8 operating guide by Gary Hinson ZL2ifb. This guide is for the seasoned FT8 op, the beginner and those who are not sure if they really want to give it a go but would like to learn what it's all about. I won't to go on and on about the guide..... just read it and find out for yourselves, it's a great addition to anyone interested or operating FT8.

Elecraft K2 out of production......say it's not so!

$
0
0
I was just reading a post on the Elecraft reflector of an amateur and that he contacted Elecraft to get some spare parts for his K1 and K2. As we all know the K1 is out of production but  he was informed the K2 is now out of production!! Say it's not sooooo but then again with parts availability and the market I knew once I heard about the Elecraft KX1 and the K1 had gone the way of the doh doh bird it would not be long before the K2 would follow. I have built 2 of these amazing radios and if the truth is the truth then it is a radio that will be missed.
                                                             UPDATE:
CORRECTION......ACCORDING TO ELECRAFT AND A POST FROM ONE OF THE OWNERS (ERIC) THE K2 IS ALIVE AND WELL AND STILL IN PRODUCTION.......YAHHHH. 

Retirement planning time!

$
0
0
Time to start planning for retirement, if you say it fast the end of 2019 is not that far off and that is my official retirement date! As the old saying goes and it's so true "Where did the time go?". I will be 59 at the time of retirement and with good health I should be enjoying this next phase of my journey for some time. So where does ham radio fit into my plans? I could say that once retired I will have all the time in the world for radio......BUT........I have been off for extended holiday periods and at that time I thought I had all the time in the world. It seems even when not working you can still become very busy and radio gets crowed out with other "things" So one of my goals is to make sure I put time aside for radio time.
One of our big retirement plans (as Julie retires the same time I do) is that we are picking up and moving to the UK! We both are citizens of that great country and will be spending our retirement years there and also traveling abroad from our UK home homebase. This brings me back to ham radio again, at this point in Canada I hold an advanced ticket which includes 12 wpm CW. I have been all over the Ofcom (Office Of Comunications) site in the UK looking for information on how my transition regarding my amateur radio licence will be dealt with by Ofcom. Those of you over in the UK reading my blog maybe you can add some insight for me in regards to when I move will my Canadian licence transfer to a UK licence, do I have to start over or a combination of both? I did try my best in going over the Ofcom website but to be honest it is a confusing site.

Update on acquiring my UK call

$
0
0
As a followup to my last post regarding the steps needed (if any) to acquire my UK amateur radio call once moved there. I do want to  thanks all those who posted comments and who emailed me regarding this question. It would seem I have just a few readers in the Uk as I did have loads of emails from there and some fantastic contacts were passed on to me. Well the verdict is in right from the Ofcom office. It would seem I have to start from the beginning and get my foundation, intermediate and then my full licence. Until the time I pass my first step the foundation licence I can apply for a reciprocal permit for 20 pounds and renew it every 6 months if need be. I'm not at all disappointed having learned this, in fact I am excited to get the old grey matter going again and I am very sure that once I have made it all the way to the full licence I will have gained some good knowledge and awaken some lost knowledge. I also became a member of the RSGB (Radio Society of Great Britain) my welcome packet arrived the other day and I was very impressed. There was a copy of the RSGB's magazine RadCom, a very nice members certificate, RSGB lapel pin and a cool key chain. I was on their website and like the ARRL it is full on amazing information and links. I spent an afternoon with a nice cup of tea navigating the information and links of their site. I also found links were I could now start warming up my grey matter for the licence adventure. The foundation licence theory is not a problem at all I just have to bush up on their rules and regs. Once I get the foundation licence is seems I have access to all bands and a power limit of 10 watts. Heck my main mode of operation here is QRP at 5 watts. With the foundation I am good to go and just keep upgrading and adding more privileges and output power.  In my retirement this will be a great way to pass the time, learn and meet the great hams of the UK.

A nice Friday afternoon on the radio

$
0
0
It been some time since I posted on the blog but it's the same old same old reason......very busy these days at work. I had Friday off and got on the radio in the afternoon to see what was happening. The band scope showed just few signals on 20m but I tuned up the Mag loop with plans of netting some contacts. I was pleasantly surprised that in just over a leisurely  hour  I contacted Jamaica 6Y5WJ, Italy IQ3MW, IF9A from the island of Favignana EU-54 it's near Trapani Sicily Italy and Slovenia S52F and S51DX. A great afternoon on CW and low power to boot.  

Spring tuneup on the MFJ 1788 Loop antenna

$
0
0
Oliver was going to watch over the operation
Each year around this time I bring the MFJ 1788 Mag loop in to take the covers off and have a look around to see how it has faired over the past year. This antenna has been great for me with my very restricted condo situation. I have been able to get all around the world on CW with most of the time 5 watts QRP. I am about 60 feet in the air, it's on the balcony and we do have other condo's all around us but having said that I have been very pleased with the performance of the loop. At first tuning the
Cleaned covers

loop took some time but now I really have the hang of things and am able to tune it in no time. Most of the time the SWR is flat or very close to flat on all bands it's designed for. Now as for band width on 15m it's very nice but as you move closer to 40m it gets very narrow but it is what it is. When reading the reviews of this antenna on Eham many have mentioned how the antenna when new from MFJ had an issue or two. My antenna also out of the box had an issue with the tuning box with a switch that had to be replaced. I purchased the antenna through DX engineering and they were very fast to have MFJ send me a replacement switch.
Now back to my yearly maintenance, the antenna is covered with a patio table cover to help it look like balcony furniture and funny thing is it does not affect the SWR at all so the cover is kept on all the time. This year I picked up a new cover as the old one was 4 years old no longer water proof and showing it's age. I removed the plastic covers  and cleaned the inside out which were really not all that dirty. I found as I do each year some loose nuts and bolts that require
Keep track of parts 
snugging up but this year I noticed one of the nut/bolt combination seemed to have some burning on it. This was one of two nut/ bolts that help secure the loop to the tuning cap. All other nut/bolt combinations were fine it was just this one that I ended up replacing with close substitution from my nut/bolt collection.  I have posted a picture of the nut/bolt that was removed, any suggestions as to what may had happened? The nut/bolt was not at all loose and it was only this nut/bolt that had an issue. One other thing I like to do is run the tuning cap full turn in both directions looking for smooth operation, spacing moving fins against the stationary fins and the function of the micro switches that stop the tuning cap at the end of each end.  Overall the antenna was in great shape and just to make sure once it was all back together and covered with new cover I tuned it through each band to make double sure all was well.
New cover and ready to go
Nut/bolt that was replaced
New nut/bolt installed


Checking fin alignment 

Kit building time.

$
0
0
When the bands are slow it's time to build a kit! I have had this RF probe kit from  Pacific Antenna that has been gathering dust and just this past weekend I decided to put it together. It's a very simple and easy kit to build and can prove to be a useful tool as well. The circuit board was simply a cap, diode and resistor. It sure was nice to get the soldering iron out and again! This mini kit is nothing
Almost done
compared to the Elecraft k2's I have built in the past. It did get me thinking that when I retire in a year and a half and if the kits are still available another K2 kit would be a nice way to pass the time in retirement. This kit went very fast but I did take my time with it as I really enjoyed getting back into the kit building again. I did find with this kit the provided jacks that are used to plug into your multimeter were not a solder type but held the test leads in via a screw. In the past I have had issues with these loosening off. I went to my trusty "this and that" pile and found two solder type and subbed those in. I have yet to use the RF probe but it was a fun little project.

The ham radio learning curve!

$
0
0
It's true with Amateur radio there is a learning curve, depending on the background that you bring to the hobby the curve can be shallow or a very deep one. I don't shy away from the "curve" as it makes the hobby very interesting and a challenge. Because amateur radio is very deep no matter what there is always a learning curve for us all. This is a great  because with most things once the interest and challenge is gone one tends to move on to something else. Funny thing about ham radio is your interest and challenge in the hobby can hit a downward swing BUT within the same hobby there are new challenges and interests.....such as the low solar cycle some may loose interest in certain HF activity but then gain a huge interest in something like FT8!
Here is a personal learning curve for me regarding this hobby....many times I have looked at the shack and said "there are some items here that I seem to be not using and are collecting dust" My thought is to convert those items into ham bucks by selling. Having said that here is my learning curve, there have been way to many times  I have sold an item or two or three and then a short time later was in dyer need of said sold item. In some cases I have had to purchase once again the same item I sold. My learning curve or my take away is just hold onto it for a little bit longer as you may end up needing it again!

Ham radio as I know it is out!

$
0
0
I decided to put my Elecraft K3, Elecraft P3  , K-pod and LP-Pan up for sale!! It may sound odd but I was very close to the K3 and it served me very well. The support at Elecraft is amazing along with many rig software updates. The gear was sold one piece at a time. First it was the LP Pan that was sold and soon after the Elecraft P3 was sold and then the K-pod was gone. Just today the Elecraft K3 was shipped out. What is left is a vacant spot on the left side of the radio desk.........hmmmm is it still called a radio desk with no radio??? Why this drastic move you ask.....well the solar cycle is at a low, I do have some real challenges in the condo with a compromised antenna and when I looked over at the roll top desk that used to hold the K3 I just was not moved to go and turn it on. I came to the conclusion I needed a new challenge, something to give my learning curve a challenge. So what am I off to next.........stay tuned to find out!
Viewing all 521 articles
Browse latest View live